Some types of plumbing can easily be replaced independently. Therefore, knowledge of how to remove an old toilet bowl will prove to be very useful - you will not have to call a plumber and adjust your plans to his mood.
Yes, and the money saved for the dismantling service can be used to purchase more useful items. If you still doubt that you can complete the work of replacing the toilet yourself, we will dispel your doubts. Next, we will talk about how to properly remove the old plumbing and what tool will be required for this.
When to start dismantling the toilet?
The need to replace an old toilet bowl with a new one arises at the most unexpected moment - a plumbing product may burst or crack if something heavy is accidentally dropped on it. Although the repair was not planned, it is not possible to live without a toilet.
In an emergency, you have to evaluate the front of future work, carefully study the shape of the toilet, how it was connected and acquire a model that has similar characteristics. This will replace the failed toilet with minimal cost.

If the crack on the toilet is not significant, then the replacement can be delayed by quietly planning the time of work. And it will take a day or two to choose the purchase of new plumbing
If the time has come to overhaul, then the form of release, the supply of water to the drain tank, the shape of the product itself will not be of fundamental importance.
In this case, you can select the model that most closely matches the idea of an ideal toilet - all the same, there is an extensive front of work and the replacement of pipes will most likely be one of the points.

When the product is damaged and completely unsuitable for use, act immediately. In this case, dismantling and installation work is best done on their own, so as not to overpay for an urgent plumbing call
Before you begin to dismantle an old or broken toilet, you must definitely buy and wait for the delivery of a new product. Also, you must immediately check whether there are all the accessories that will be needed when replacing.

Models, the release of which is embedded in the floor, look aesthetically pleasing, but in the event of a pipe leak, you have to remove the tile and crack the floor - it is difficult, long and expensive
Safety measures before starting work
When you plan to replace the toilet, there are doubts about the advisability of doing all the work yourself. In fact, you can cope on your own with the removal of the old and the installation of a new device. The main thing is to do everything sequentially, following the recommendations of the manufacturer and following the advice of experienced craftsmen.
Image Gallery
Photo from
Dismantling the toilet when installed on a tile
Installation on concrete taffeta
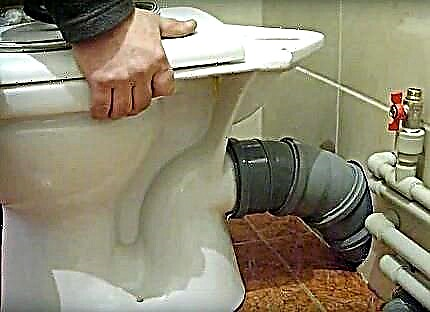
Connection to the sewerage by a corrugated pipe
Connection to the sewerage pig-iron branch
There are 3 options for the work:
- invite plumbing;
- invite shabashnik;
- do it yourself.
The first option is suitable when there is a scheduled repair and there is no time limit. Sometimes plumbing has to wait for weeks - he constantly has unforeseen circumstances.
Inviting a cobbler can result in even more expenses - it’s good if you come across an experienced craftsman whose hands grow from the right place. Otherwise, he can destroy the entire bathroom.

Some co-workers love to dismantle the toilet with a sledgehammer. It is fast and does not require much work - a couple of swings and no toilet
The last option of independent work is the most profitable - you can get practical experience and money will be saved. Yes, and large destruction can be avoided.
If it was decided to get practical experience in dismantling the toilet, then we must not forget about safety measures, because in the process of work various tools can come in handy.
Care should be taken to protect the eyes, hands, other important organs and parts of the body. To do this, wear special glasses, tight gloves, a face mask to protect the respiratory system. Clothing should completely cover the arms and legs, so that sharp fragments do not accidentally damage the skin.

You may have to use a grinder - so you can’t do without protective glasses and gloves
The technology of dismantling old plumbing
Having decided to carry out the dismantling of the toilet yourself, you need to familiarize yourself with the theoretical part and only then proceed with the practical application of the knowledge gained. Only having a full understanding of what remains to be done is it easy to develop an action plan and act according to it.
To get an initial idea of the typical sequence of works on the removal of plumbing, consider the process of dismantling a toilet bowl with a direct release:
Image Gallery
Photo from
In order to remove the old plumbing, turn off the water supply to the tank. Rinse off the leftovers, take a sponge to dry to the maximum inside
Unscrew the nuts located under the toilet bowl with a wrench. After unscrewing, they need to be removed from the tank, then remove and remove it directly
Find the caps on the base of the toilet that cover the caps of the screws, remove them and unscrew this fastener with a wrench
The direct-discharge toilet is sealed at the connection to the sewer pipe with a wax o-ring. It needs to be broken by gently shaking the toilet from side to side. Having broken the ring, we separate the bowl and remove it so that it does not interfere
Carefully remove the remnants of the wax seal, carefully and carefully scrubbing the surface with a spatula. We throw out the old wax, we wipe the connecting flange with a stiff brush
We shut up the sewer outlet with unnecessary rags. Put a bucket on top of the closed hole so that gas from the sewer does not penetrate the room
To replace the dismounted toilet bowl, we select a new device in the store, check the flushing efficiency, test for ease of use, determine with a comfortable height - we buy
In place of the dismantled, we install and fasten a new bowl. Screw the toilet to it with the drain valve installed earlier. We connect the device to the sewer and check for leaks by pouring water into it
Stage 1: Shutting down and draining plumbing water
Stage 2: Separating the flush tank from the toilet
Step 3: Unscrew the toilet holding screws
Stage 4: Breakage of the seal and removal of the toilet bowl
Stage 5: Cleaning the flange after removing the toilet
Stage 6: Temporarily blocking the sewer pipe
Step 7: Buy a new toilet to replace
Step 8: Install and connect a new toilet
The first stage: preparation of the facility
The first step is to carry out preparatory work, carefully examining the toilet and all fixtures. This will help determine the set of necessary tools for dismantling.
Then you should clean the bathroom as much as possible from unnecessary items - take out basins, buckets, a washing machine, if it will interfere with free access to the toilet. In a word, it is necessary to remove from the room everything that can interfere or there is a chance of accidental damage.

Better not to start working without gloves - the risk of injury or a deep cut is very high
Preparing an object for deletion consists of the following:
- preparation of the necessary tools;
- washing the product from surface contamination;
- shutdown of the water supply system;
- removal of water from the drain tank;
- preparation of dry cuts of fabric, old towels or sponges and other soft materials that can absorb water.
It is important to carefully inspect all fasteners - if once silicone sealant was used for sealing, then you will also need a construction knife to remove it.

With a construction knife, it is easy to cut off the sealant that is firmly stuck. Residues can also be removed with a special silicone remover or with solvent P646
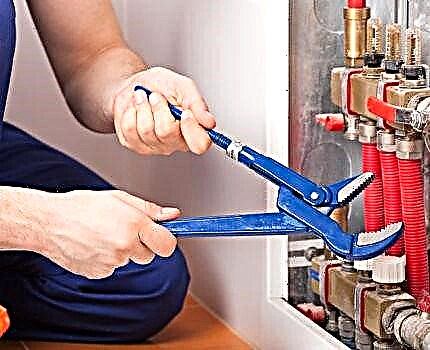
Also, regardless of the model of the toilet and the location of the drain tank, you have to turn off the tap on the pipe that brings water to the house / apartment. Then you need to check whether everything worked out by opening the tap for this. If the water does not flow, everything has been completed and preparatory work can continue.
Water must be drained from the tank so that it does not interfere with further dismantling. Dry sponges, old towels and floor rags are useful for wiping puddles and making an impromptu gag to close the entrance to the sewer socket.
This measure partially protects the residents of the apartment / house from the penetration of an extremely unpleasant odor from the sewer riser after dismantling the toilet.

It is necessary to block the water supply pipe in any case - water should not interfere with work
If the toilet is walled into the floor or the cistern is in the wall, you will have to remove the tiles, freeing access. Also, do not forget about the tanks built into the wall.
When dismantling such products, serious damage cannot be avoided. Work on removing tiles, removing decorative coatings or panels should be carried out in advance, at the preparation stage.

It is convenient if there is a separate tap that will allow you to shut off water to the drain tank without resorting to a complete shutdown of water in the apartment / house
Second stage: dismantling the tank
When the water is shut off, you can proceed to the next step - remove the drain tank, not forgetting to first free it from the water. Moreover, it does not matter exactly where and in what way it was installed. If the tank is hidden in a wall niche, then you have to break the decorative structure, remove the tiles, trim panels and other types of finishes.
Then you should carefully remove the lid from the tank - this will prevent its accidental fall during dismantling. If this is a model of a drain tank with a button, then first you have to unscrew the button, and only then remove the cover.

The lid of the drain tank can not be removed, but then it is likely that during the work it will fall on your foot or even break, injuring someone with fragments
When the lid was removed, it must be removed from the room so as not to interfere with further work. Now you need to unscrew the flexible eyeliner that supplies water to the tank. To do this, use a wrench of the appropriate diameter and carefully unscrew it, taking care not to damage the adjacent walls.

If the new toilet has the same arrangement of all the holes for connection, and the flexible eyeliner is in excellent condition, then its second end can be unscrewed
Then you need to unscrew the bolts securing the tank to the wall, if any. If the drain tank is on the shelf of the toilet, then you have to unscrew the bolts that hold the tank in a fixed place.

It happens that the compact toilet bowl + cistern has served for many years and the mounts are fixed tightly. In this case, you may need a grinder to remove the bolts
It remained with smooth movements to remove the tank and remove it from the bathroom. It is important to act confidently - if the first time it was not possible to remove the container, you need to try again one or two, applying great force. If only the toilet tank is out of order, then you can replace it only, without proceeding with the complete dismantling of the product.

The main thing is to act smoothly, slowly, with force swing the tank from side to side, trying not to drop
Stage Three: Removing the toilet bowl
When the tank is removed, you can proceed with the removal of the toilet bowl itself. To do this, it is advisable to first release it from the cover by carefully unscrewing the bolts that hold it in place. It is important not to damage anything - often the mistress buys the cover separately, choosing an expensive, beautiful and comfortable seat.

The lid can not be removed, but then it can be accidentally broken during dismantling and it will not be possible to use it together with the toilet in the country
Now you have to unscrew the bolts securing the sole of the toilet to the floor. This stage can be simple or more complex - it all depends on the method of attachment:
- if the toilet is fixed only with bolts, then they need to be unscrewed;
- when sealant is used as a sealant, you will need a knife to gently cut the silicone layer;
- if the base of the toilet is concreted on the floor, you will have to use a chisel, a hammer, a sledgehammer.
It happens that the sole of the toilet is attached to a thick wooden board embedded in the floor. After 10-25 years of using the plumbing fixture, a board called taffeta rots. Therefore, it is not difficult to remove the toilet, but the board also needs to be removed.

Sometimes bolts stand tight and can not do without destructive actions. In this case, you need to apply a strong point blow to the hammer next to the bolt on one and the other side of the sole of the toilet
The next step is to remove the drain from the toilet. The front of work will depend on the material from which it is made.
It could be:
- flexible discharge;
- plastic;
- cast iron.
If in the first option you can easily pull out a flexible drain from the toilet, then in the second and third case you will have to work hard, removing it. Particularly difficult may be the work of removing the cast-iron pipe.

To disconnect a cast-iron pipe, a chisel or drill may be needed to pick out flax from the joints
If the plastic drain does not lend itself in any way, it can be sawn with a hacksaw for metal or cut with a hot knife.
Then clean the pipe from all types of windings, for many years ensuring tightness and protecting against leaks.

When the toilet cannot be pulled out of the flexible drain, you can carefully cut the plastic with a knife
It remained with strong swaying movements to remove the toilet bowl without damaging the sewer pipe. It is important to act smoothly.
If nothing happened the first time, you don’t need to immediately take up the sledgehammer - you should repeat the process a couple more times and everything will work out.

When a sledgehammer is used to remove the toilet, fragments can injure yourself and damage the tiles on the floor and walls
It remains to take out the dismantled bowl from the bathroom so that it does not interfere with further work.
Fourth stage: sweeping the territory
The volume of work at the last stage completely depends on the previous stages and on what material the drain is made of. If we are talking about a cast-iron pipe, it will have to be removed to replace it with a lighter and more functional flexible drain.

Remove the cast iron pipe carefully so as not to damage the entrance to the sewer
It happens that removing the pipe and cleaning the inlet can take more than 2 hours. But this is justified, because in the future the process of dismantling the plastic corrugated pipe will take a few minutes.
Yes, and leakage, if it occurs, is much easier to eliminate than in cast iron.

If everything is done calmly and smoothly, then there will be a minimum of garbage, and cleaning will take 20-30 minutes
When the toilet was attached to the taffeta, it is necessary to remove all the remnants of the rotten board and install a new one in its place, using grease glue and fastening it to the screws. Or you can immediately fill the hole with a solution.

Install new plumbing only after the solution is completely dry
If, out of ignorance, the toilet was not removed, but knocked out using a sledgehammer or other heavy tool, then work on cleaning the bathroom will take a long time.
To carefully clear the place for installing new plumbing, you will have to make an effort.

Broken toilet fragments can spoil the wallpaper, tiles and other decorative coating in the room
Acting smoothly and accurately, you can remove the toilet without damaging anything. He will be fully ready for installation in the country.

An old toilet bowl, the dismantling of which is done correctly, will be able to serve for many years in the bathroom of a country house
You can remove the toilet yourself. The video demonstrates how to do this correctly:
On your own, you can remove the toilet, mounted on a thick wooden plate - taffeta. The video shows how to do this carefully:
You can dismantle the toilet on your own, armed with the right tools and a step-by-step work plan. In this matter, it is important to do everything extremely carefully, not forgetting about personal safety. Indeed, a fragment may break away from the old toilet bowl during dismantling, which in itself is a danger.
Removing the old plumbing fixture with your own hands will take from 30 minutes to 2-3 hours.
If you possess the necessary knowledge and can give valuable advice to our readers on the issue of dismantling old plumbing, please leave comments under the article. You can also ask questions of interest to you on the topic, and we will try to respond to them promptly.