Preparation for bath procedures includes heating the steam room and heating the water to wash. The logical solution is to save time and combine both operations using a wood stove as a heater and water heater. Here the user is faced with a traditional problem: you need to choose and buy a ready-made stove for a bath with a water tank or make it yourself. Consider the existing options for factory and home-made wood-burning stoves.
Types of bath stoves with heated water
According to the manufacturing material, bath stoves with a tank are divided into 3 groups - cast iron, steel and brick. Metal heaters are sold ready-made, stone stoves are laid out in place. Let's make a brief comparison of these two categories:
- a brick heater will cost significantly more than a metal "brother";
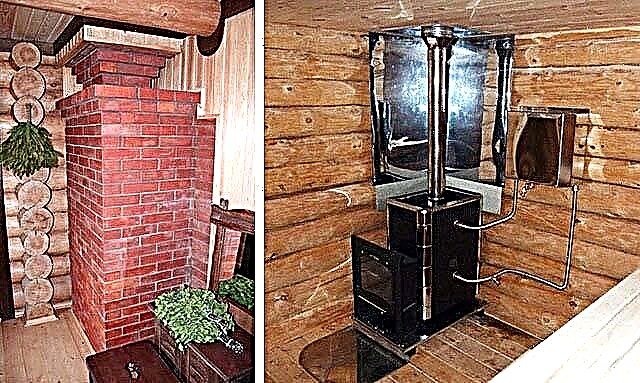
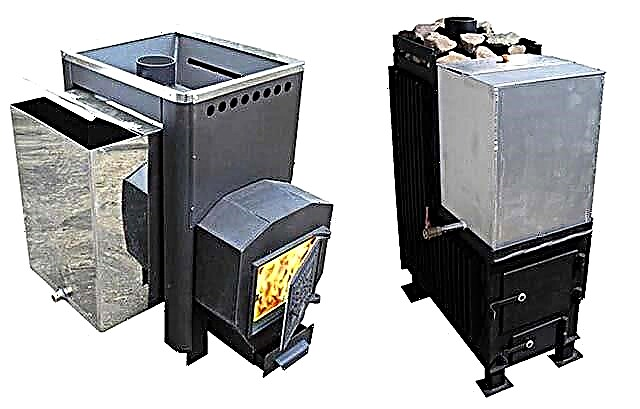
- a brick oven is able to heat all rooms of the bath, a steel potbelly stove - only a steam room and a dressing room (see photo below);
- steel or cast iron stoves quickly warm up and cool down, the stone stove accumulates and retains heat for a long time;
- a metal wood heater is easier to install, a brick heater needs a solid foundation and the hands of a good craftsman.
Conclusion: the construction of a brick oven is appropriate at the stage of construction of the bathhouse, designed to wash more than 5 people at a time. For a small steam room for 2-3 people. quite a steel potbelly stove with an external firebox.
The water heating tank is combined with the stove in 4 ways:
- The hinged container is attached externally to the side wall of the firebox or is placed on the casing of a horizontal furnace, filled through the top cover. Hot water is drawn from a tap or scooped up with a bucket.
- The tank is built into the body directly above the firebox or heater.
- The remote tank is placed in the washing and heated by a water circuit mounted in the firebox.
- A separate tank receives heated water from a samovar-type heat exchanger mounted on a chimney.
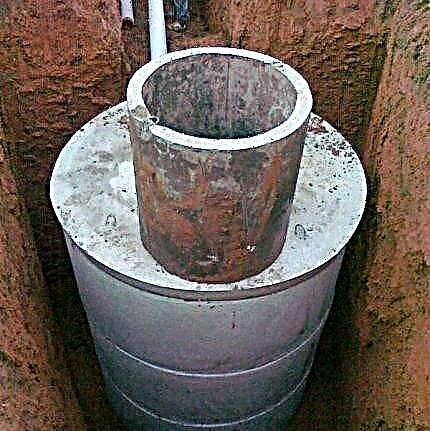
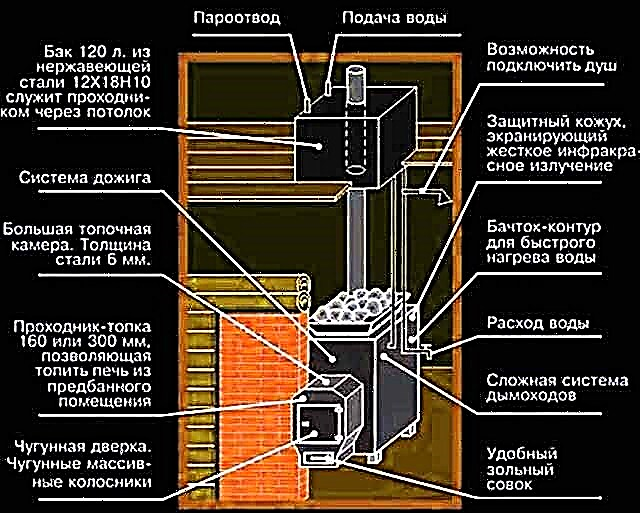
There are potbelly stoves with a water boiler right on the chimney. Manufacturers recommend installing the tank in the opening of the wooden ceiling, as shown in the diagram. The solution allows you to kill two birds with one stone: arrange a fire furnace cutting and create a natural pressure of water in the shower.
We propose to separately consider the pros and cons of each of these options.
Hinged containers
An open-type attached tank is the cheapest and right solution for a traditional Russian bath, where a shower is not foreseen. The design is nowhere simpler - a rectangular tank with a lid is welded from stainless steel and attached to the body of the furnace. The location of the tank is on the side wall, on top of the firebox or inside the heater.
Reference. The purpose of bathing procedures is the removal of toxins from the body that are released together with sweat in the steam room. Water heated in a hinged tank is at hand, diluted to the desired temperature and used to rinse the body. Water is scooped up with a bucket, repeated washing is done after patting with a broom.
Almost any wood-burning stove for a bath can be equipped with a hanging tank. A primitive option is a large pan or bucket with a lid mounted on top of the firebox.
Disadvantages of stoves with attached tanks:
- the tank heats up much earlier than the steam room is heated;
- water must be constantly diluted in order to prevent boiling;
- overhead tank increases the dimensions of the furnace, taking away the useful volume of the steam room.
Judging by the reviews of fans taking a steam bath in the bathhouse, not everyone likes traditional tanks. The modern user wants to rinse under the shower, and not doused with a dipper.So it’s worth considering other options.
Stoves with integrated tank
Heaters of this series are distinguished by a vertically oriented housing divided into 3 compartments:
- a combustion chamber and an ash pan are located in the lower part of the housing;
- middle section - a closed-type heater equipped with a loading hatch;
- upper part - a water tank equipped with a safety valve;
- the smoke channel exits the firebox and permeates the next two sections, heating stones and water.
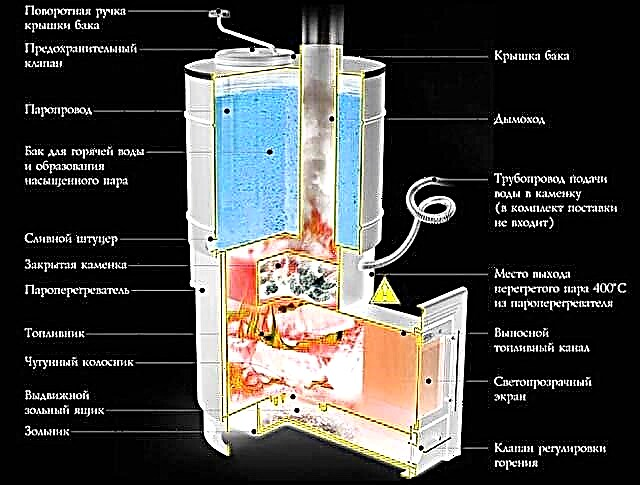
On top of the tank is a lid for a gulf of cold water, and on the side is a drain valve. In some factory furnaces, the principle of a superheater is introduced - the vapors released during boiling water are sent to additional heating from flue gases. The result is dry, hot steam supplied to the sauna.
When you want to stop boiling, cold water is added to the container. Dry steam production is an important advantage of an internal tank over a mounted tank. Plus, saving the steam room by increasing the height of the stove. Other tank placement options are shown below in the photo.
The main disadvantages repeat the negative aspects of attached tanks - heating is too fast, the need for dilution and selection of useful heat. There are also own disadvantages:
- without a thermometer it is difficult to catch the moment of boiling;
- the tank must be equipped with additional pipelines for water supply and emergency steam removal through the safety valve;
- the weight and price of such a heater is much higher.
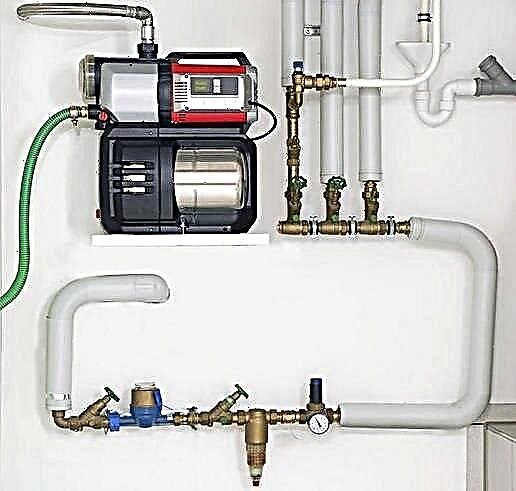
Water heating circuit and remote tank
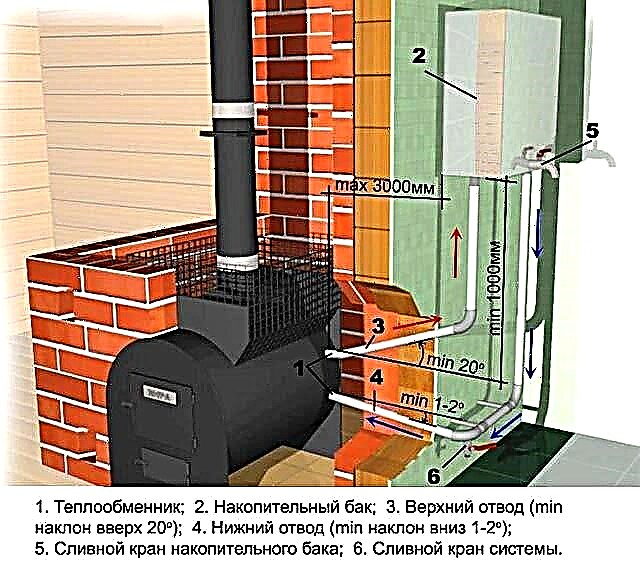
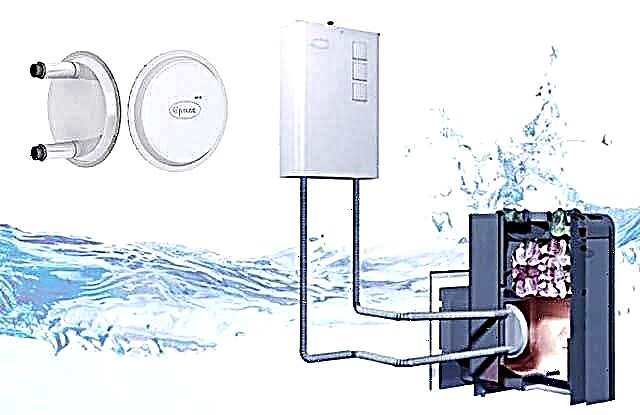
The heat exchanger installed inside the firebox of the sauna stove allows you to remove the storage tank with water from the wall and organize a wash in the shower without buying an electric boiler. A hot water supply device looks simple: a tank suspended from a wall is connected to a heating coil by pipes.
An important point. So that the internal heat exchanger does not burn out, it is necessary to organize the selection of heat in the only way - continuous circulation. If the distance from the furnace to the tank does not exceed 2.5 m, the pipes are laid with a slope for the natural flow of water, as shown in the diagram. Otherwise, you need a circulation pump.
For the convenience of washing, you will have to pay the following negative points:
- DHW circuit takes away a lot of heat from the stove, increasing the heating time of the bath;
- it is impossible to operate the furnace with an empty coil - the metal will quickly burn out;
- boiling and vaporization in the heat exchanger is unacceptable - the heater will fail;
- if the heater's piping is made of plastic, you need to monitor the flow temperature - from overheating, the pipes can "float" and collapse.
Note. Built-in coils for domestic hot water are often used in bath and heating stoves, made of brick. The heat exchanger is a register of thick-walled steel pipes or a boiler - an iron tank, placed inside the smoke channel (not in the furnace).
The DHW system, powered by a furnace coil, is quite viable and recommended by many manufacturers. An example is an Ermak-16 furnace with a heat exchanger designed to operate with a separate tank with a capacity of 60 liters.
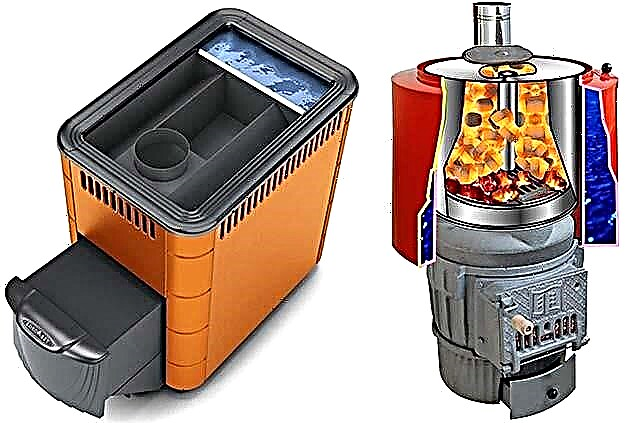
Samovar heat exchanger
The principle of operation of this water circuit is similar to the heating of water by an internal coil, the piping scheme is similar.
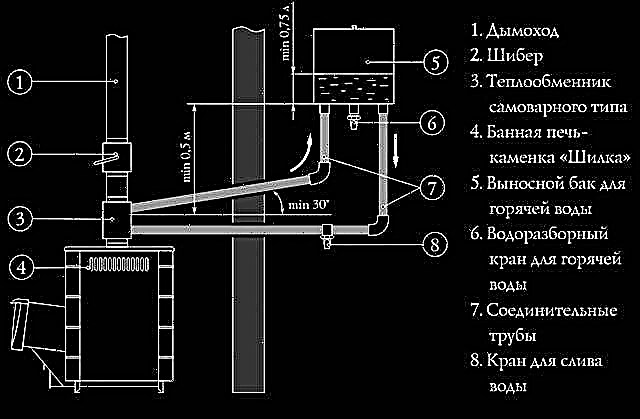
The difference is in the location of the heat exchanger mounted on the chimney, and not inside the heater. The technical solution gives 4 important advantages over other options:
- The water heater does not affect the operation of the stove and does not slow down the rate of heating.
- The element removes heat from the combustion products of firewood, increasing the overall efficiency of the heating unit.
- The temperature of the exhaust gases is significantly lower than in the firebox (200-400 ° C versus 600-800 degrees), so the heat exchanger is not too afraid of boiling or accidental emptying.
- The chimney circuit can be purchased separately and fitted to any type of wood heater.
A number of manufacturers, for example, the Varvara brand, offer bath stoves with a water tank installed directly in the chimney. The tank can be placed within the steam room and use water to rinse, or build a tank in the ceiling and bring the pipe to the shower. In the second case, it is necessary to make recharge and discharge through individual pipelines.
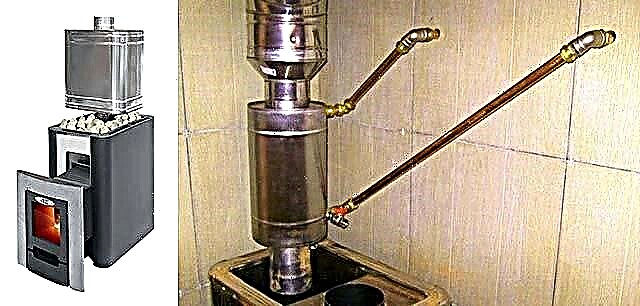
The only drawback of samovar heat exchangers (technical name is the economizer) is the need for frequent removal of soot from the chimney. The hot water heater lowers the temperature of the exhaust gases, causing sedimentation of soot particles and tar. Under normal conditions, these pollutants simply burn out in a hot pipe. Recommendations for choosing a product, see the video:
General conclusion. For a Russian bath without a shower, simpler and cheaper options are suitable - stoves with an internal and hinged tank. A furnace coil is not a very good solution, the element serves much less than the stove itself. A chimney heat exchanger is perfect for heating water in a storage tank located in the washing room of the sauna.
Spread brick oven
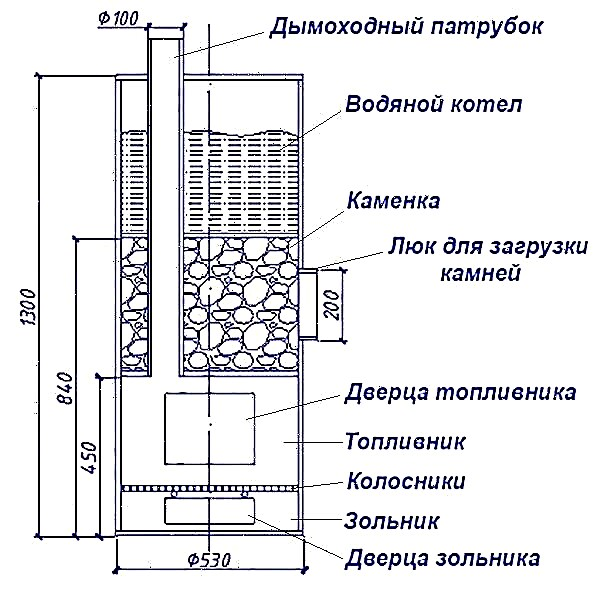
If you have some practical experience in the construction of brick ovens, try to fold a major sauna stove with your own hands. We offer a variant of a stove-heater with dimensions of 102 x 129 cm, equipped with a 170 liter tank and designed to heat a bath with an area of 12 m².
To erect the stove shown in the drawing, prepare a set of materials:
- corpulent clay brick (red) - 580 pcs.;
- shamotny stone of the ShA-8 brand - 80 pieces;
- cast iron grate 30 x 25 cm in size - 2 grates;
- main door for loading firewood - 210 x 250 mm;
- ash chamber door - 14 x 25 cm;
- smoke damper - 320 x 450 mm;
- heater door - 51 x 42 cm;
- steel pipe with a diameter of 57 x 4 mm - 6.3 m;
- iron strip with a section of 40 x 5 mm - 2 m;
- the same, measuring 80 x 10 mm - 2.5 m;
- basalt cardboard, roofing material.
Note. The list did not include the brick needed for the construction of the chimney, cement, clay and sand for mixing the mortar.
Also, before construction, it is necessary to weld a tank-boiler with dimensions of 102 x 77 x 25 cm from sheet steel of the St20 grade with a thickness of at least 3 mm. We will not describe the technology for the construction of a reinforced concrete foundation, the preparation of mortar and furnace masonry - it is described in detail in the instructions for erecting a fireplace.
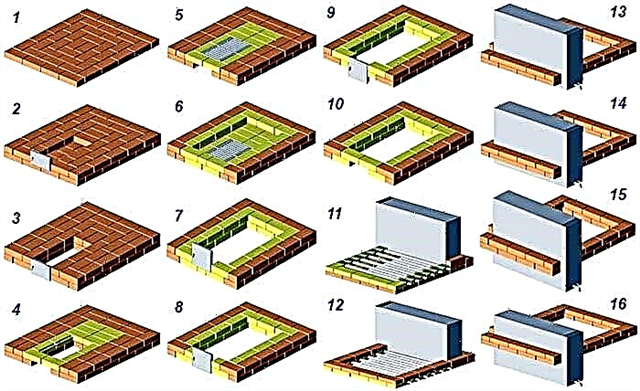
We proceed to the construction of the furnace according to the presented procedures:
- Zero and first rows fit into a continuous. Tiers 2 and 3 form an ash pan, a blower door is installed.
- Row number 4, overlapping the door, is the bottom of the fuel chamber, partially laid out with refractory stones with a gap of 5 mm from red bricks. Undercutting is done, the grate and loading door are inserted.
- When stacking tiers 5–9, the walls of the firebox are built. On the 10th row, cells for pipes are prepared, cut into blanks with a length of 1050 mm. These parts are laid in nests and sealed with basalt cardboard, a water tank is installed.
- From the 11th to the 20th tier, the walls of the furnace are erected around the tank. On the 20th row, the end of the boiler is overlapped by two steel strips L = 35 cm.
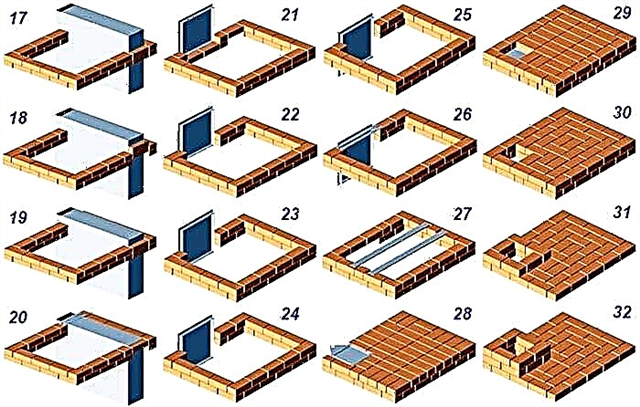
- On the 21st row, the door of the heater is installed, the laying of the outer walls continues according to the scheme up to the 26th tier. On top of the door we put 2 strips 650 mm long.
- On the 27th row, the overlap of the stove begins to form. Cuts are made for laying large strips with a length of 120 cm. Bricks of the 28th tier block the cavity of the heater, leaving a chimney opening.
- The flue gas valve is placed on the 28th row, tiers 29–32 finally form the furnace vault and the transition to the chimney.

Six jumpers in the form of pipes Ø57 mm serve as supports for the future massif of stones and at the same time are convective air heaters in the sauna. After 2-3 days, when the solution dries thoroughly, you need to eliminate the defects, load the heater and start a trial kindling. For a detailed description of masonry in rows, see the next video:
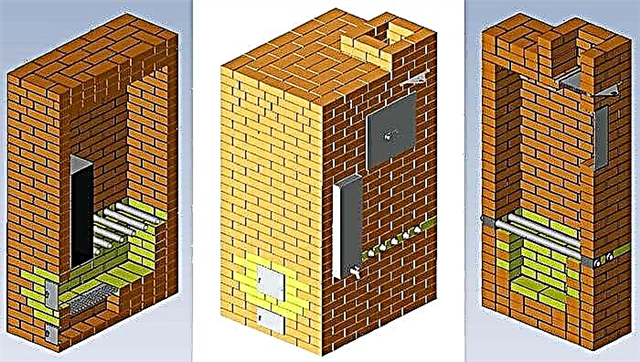
We make a steel stove-heater
The device of a home-made sauna stove with a built-in heater and a water tank is shown in the drawing. The design is quite simple - the heat generator body made of an iron pipe is divided into 4 compartments - an ash chamber, a furnace, a stove and a heating tank for water. Grids are installed at the bottom of the firebox, metal partitions intersected by a chimney are installed between the remaining sections.
For the manufacture of the heater will go such materials:
- a pipe with a diameter of 400-500 mm;
- sheet metal with a thickness of 3 and 5 mm on the partitions;
- fittings or corners on the grate;
- pipe Ø10-15 cm to the chimney.
Tip. It is advisable to find a thin-walled pipe (3-5 mm) for the body, since standard metal rolling with a wall thickness of 8-10 mm will come out too heavy. The height of the stove can be adjusted due to the size of the heater, tank and firebox.
The order of assembly of the heat generator with an integrated tank:
- Align the ends of the pipe with a grinder, cut openings for loading hatches and doors. Cut sharp edges.
- Put the cut pieces of metal on the door - strip the edges, weld the handles and hinges.
- Make round partitions with openings for the flue. Make the furnace chamber of 5 mm thick steel, the remaining covers of 3 mm sheets.
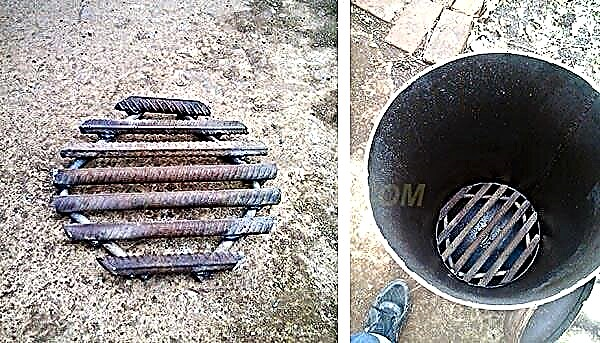
- Weld grate from reinforcement Ø12-18 mm or corners No. 4-4.5.
- Mount all workpieces according to the drawing. Strip welds and check for permeability with kerosene.

Equip the tank located on top with a convenient lid, cut the fitting into the bottom of the tank and install a drain cock. The joint of the chimney and the roof of the firebox is best reinforced with stiffeners made of metal triangles, since this place burns out first. How to make such a stove correctly, see the last video:
Conclusion
Although homemade wood heaters are cheaper than factory heaters, most homeowners prefer to buy ready-made stoves for saunas and Russian baths. Hot water tanks are equipped with stoves of many famous brands: Ermak, Varvara, Termofor, Vesuvius and so on. The main thing is to make the right choice, taking into account our recommendations.